Introduction#
Taking screenshots and screen recordings is a normal part of documenting work for blog posts, reports, or sharing with colleagues. The problem is that real environments have real people in them: faces visible in a webcam, bystanders in a dashcam clip, colleagues on a shared screen. Blurring them manually in an image editor gets tedious fast, and doing it frame-by-frame on a video is not realistic.
I wanted a tool I could run from the terminal that would handle the detection and censoring automatically, with no external API calls and no frames leaving the machine. The result is face_censor.py, a single-file Python script built on OpenCV that processes images, videos, and live webcam feeds.
What it Does#
The script detects faces using a computer vision model and applies one of three censor effects to each detected region:
- Blur: Gaussian blur with a 99x99 kernel, smoothing away all identifying detail while keeping the face shape recognizable.
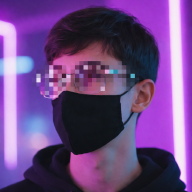
- Pixelate: shrinks the face region to a 12x12 grid and scales back up, producing the classic news-broadcast mosaic.
- Blackbox: solid black rectangle, maximum coverage, useful when the output will be processed by another tool and needs a hard mask.
All effects include a 10% padding margin around the raw detection box so hairlines and chin edges are covered rather than clipped at the boundary.
Input can be a static image, a video file or a live webcam feed. In webcam mode the effect is switchable at runtime with a keypress without restarting the script.
Face Detection#
The script uses two detectors and picks the best available one at startup.
OpenCV DNN - ResNet SSD is the primary detector. It takes each frame, resizes it to 300x300, normalises the pixel values and runs it through a Single Shot MultiBox Detector trained on the ResNet-10 architecture. Each detection comes with a confidence score, only detections about the threshold (default 0.5, adjustable with --confidence) are kept. It handles angled faces, partial occlusion and varying lighting conditions well.
Haar Cascade is the fallback, used when the DNN model files are not present. It is built into OpenCV so it requires no downloads, but it is front-face only and struggles with low light and non-frontal angles.
The DNN model is about 10MB total and is downloaded once with a single command. After that the script works fully offline.
Setup#
Setup the virtual environment and install the dependencies:
[greycipher@remnant ~]$ python3 -m venv .venv
[greycipher@remnant ~]$ ./.venv/bin/activate
[greycipher@remnant ~]$ pip install -r requirements.txt
Download the DNN model (recommended, one-time):
[greycipher@remnant ~]$ python3 main.py --download-models
  Downloading deploy.prototxt...
  Saved -> models/deploy.prototxt
  Downloading res10_300x300_ssd_iter_140000.caffemodel...
  Saved -> models/res10_300x300_ssd_iter_140000.caffemodel
Done.
If you skip this step the script will falls back to Haar Cascade automatically, no error, just lower accuracy.
Usage#
Images#
[greycipher@remnant ~]$ python3 --input photo.jpg --effect blur
[INFO] Using OpenCV DNN face detector (ResNet SSD)
[OK] 3 face(s) censored -> photo_censored.jpg
The output is saved as photo_censored.jpg in the same directory automatically. To specify the output path:
[greycipher@remnant ~]$ python3 main.py -i photo.jpg -o result.jpg -a pixelateSupported formats: .jpg, .jpeg, .png, .bmp, .tiff, .webp
Video Files#
[greycipher@remnant ~]$ python3 main.py --input video.mp4 --effect blackbox
[INFO] Processing 1800 frames at 30.0 fps …
  30/1800 (2%)
  60/1800 (3%)
  ...
[OK] Done → video_censored.mp4
Original FPS and resolution are preserved. The output uses the mp4v codec, if your player has trouble , re-encode with FFmpeg:
[greycipher@remnant ~]$ ffmpeg -i video_censored.mp4 -c:v libx264 output.mp4Audio is not coped to the output. To re-attach the original:
[greycipher@remnant ~]$ ffmpeg -i video_censored.mp4 -i original.mp4 -c copy -map 0:v:0 -map 1:a:0 final.mp4Webcam#
[greycipher@remnant ~]$ python3 main.py --webcam --effect blurOpens the default camera. Switch effects without restarting:
| Key | Effect |
|---|---|
B | Gaussian blur |
P | Pixelation |
K | Black box |
Q | Quit |
Tuning Detection#
The default confidence threshold of 0.5 works well for most inputs. Two situations wher you will want to adjust it:
Too many false positives: objects being flagged as faces:
[greycipher@remnant ~]$ python3 main.py -i video.mp4 -e blur --confidence 0.7Missing faces: real faces not being detected:
[greycipher@remnant ~]$ python3 main.py -i video.mp4 -e blur --confidence 0.2Lowering the threshold catches weaker detections at the cost of more false positives. If faces are still being missed at 0.3, check whether you have the DNN model downloaded, the Haar fallback is significantly less sensitive on angled or partially occluded faces.
How the Detection Pipeline Works#
For each frame the DNN detector does the following:
- Resize the frame to 300x300 pixels
- Subtract the mean pixel values
(104, 177, 123)to normalise - Pass the blob through the ResNet SSD network
- For each detection above the confidence threshold, project the bounding box coordinates back to the original frame dimensions
- Clip coordinates to the frame boundaries so no region extends outside the image
The result is a list of (x, y, w, z) tuples, one per detected face. The censor function then adds the 10% padding margin before applying the chosen effect.
The code for the DNN detection step:
def detect_faces_dnn(net, frame, confidence_threshold=0.5):
    """Return list of (x, y, w, h) using DNN detector."""
    h, w = frame.shape[:2]
    blob = cv2.dnn.blobFromImage(
        cv2.resize(frame, (300, 300)), 1.0, (300, 300),
        (104.0, 177.0, 123.0)
    )
    net.setInput(blob)
    detections = net.forward()
    faces = []
    for i in range(detections.shape[2]):
        confidence = detections[0, 0, i, 2]
        if confidence > confidence_threshold:
            box = detections[0, 0, i, 3:7] * np.array([w, h, w, h])
            x1, y1, x2, y2 = box.astype(int)
            x1, y1 = max(0, x1), max(0, y1)
            x2, y2 = min(w - 1, x2), min(h - 1, y2)
            if x2 > x1 and y2 > y1:
                faces.append((x1, y1, x2 - x1, y2 - y1))
return facesLimitations#
A few things worth knowing before using the tool on real footage:
- The DNN model was trained on frontal and slightly off-axis faces. Extreme profile angles beyond roughly 45° may not be detected.
- Very small faces below about 30x30 pixels in the source resolution are generally missed by both detectors.
- The Haar fallback in front-face only and performs poorly in low light.
- Audio is not preserved in video output, re-attach with FFmpeg if needed.
All CLI Options#
| Flag | Short | Default | Description |
|---|---|---|---|
--input | -i | — | Input image or video file |
--output | -o | auto | Output file path |
--webcam | — | false | Use live webcam feed |
--effect | -e | blur | Censor effect: blur, pixelate, blackbox |
--confidence | -c | 0.5 | DNN detection confidence threshold (0–1) |
--download-models | — | false | Download DNN model files and exit |
Practical Examples#
# Pixelate all faces in a group photo
[greycipher@remnant ~]$ python3 main.py -i group_photo.png -e pixelate

# Black-box faces in a dashcam video, high confidence only
[greycipher@remnant ~]$ python3 main.py -i dashcam.mp4 -o dashcam_safe.mp4 -e blackbox -c 0.65

# Real-time webcam starting with pixelation
[greycipher@remnant ~]$ python3 main.py --webcam -e pixelate

# Re-download models if they get corrupted
[greycipher@remnant ~]$ rm -rf models/
[greycipher@remnant ~]$ python3 main.py --download-models
What’s Next#
A few things I would add in a future version:
- Audio passthrough in video mode without requiring a separate FFmpeg step
- A
--regionflag to manually specify additional areas to censor beyond detected faces, useful for license plates or screen content - Batch processing a directory of images in one command
- YOLO-based detection as a third detector option for better coverage on angled faces
The Code#
Full project on GitHub: GreyCipher-sec/FaceCensor